Devstack multinode with neutron and vagrant
In this post I am going to share my experience of running neutron multinode with devstack. I am assuming that you are familiar with openstack, devstack and vagrant. If not I advise you to learn at least about openstack and come back here when you feel comfortable with different components of openstack. I created three vms to do the experiment. The most useful thing I learnt from this experiment is how external network in neutron works.
- node1 (controller+compute)
- node2 (compute)
- node3 (access)
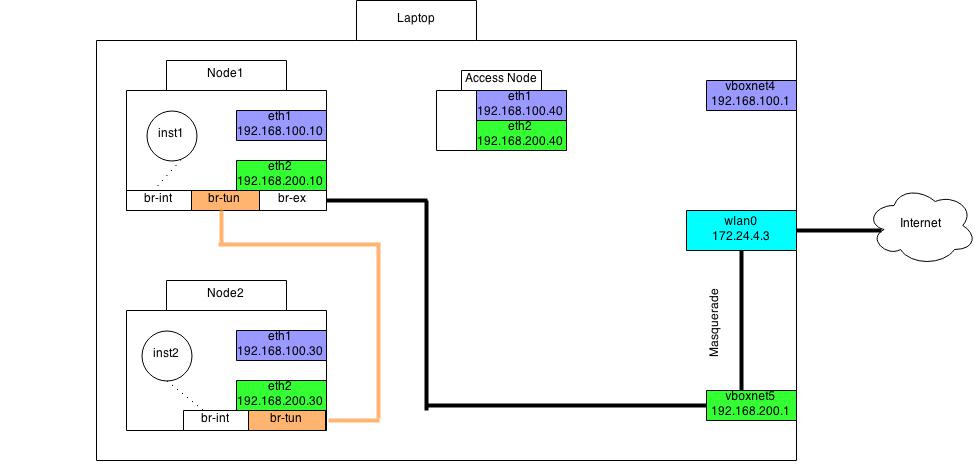
Vagrantfile
Here is how my Vagrantfile looks like: Vagrantfile As you can see I have two interfaces attached to each of the vm. The first interface eth1 serves as management network + data network in both node1 and node2. The eth2 interface serves as the external network in this deployment. The eth2 interface in access node is used to ssh into vms created with openstack.
local.conf
Here is how local.conf file looks like in node1: local.conf. If you are not behind a proxy please remove the variables http_proxy and https_proxy from local.conf. Usually I run a squid proxy locally to cache packages so that I won’t have to fetch packages from internet everytime I run devstack. Similarly local.conf file in compute node looks like: local.conf. The only thing extra added here is SERVICE_HOST variable. This should point to the ip address where your controller node is running.
After running stack.sh with above local.conf setting in node1
Go to your controller node. See the bridges created by openvswitch with:
sudo ovs-vsctl show
You can see that three bridges are created by devstack for you.
- br-int
- br-tun
- br-ex
Now to use eth2 subnet range as external ip we need to attach eth2 interface to br-ex bridge. Do it by:
sudo ovs-vsctl add-port br-ex eth2
Now add security group rules to allow icmp and ssh into vms.
    nova secgroup-add-rule default icmp -1 -1 0.0.0.0/0
    nova secgroup-add-rule default tcp 22 22 0.0.0.0/0
Now boot a vm using nova boot.
nova boot --flavor m1.nano --image <image_id> --nic net-id=<subnet_id associated with private network> inst1
Now create a floating-ip and attach it to the vm created above. To do that get the port-id associated with the ip address assigned to the vm. The commands to use are:
    neutron port-list
    neutron floatingip-create
    neutron floatingip-associate <port_id> <floatingip_id>
Now login to your access node. You should be able to ping inst1(vm created by openstack) using the floatingip assigned to it. You should also be able to ssh into the machine. Go ahead and log into the inst1. You won’t be able to access internet from inst1. To do that you need to masquerade the traffic coming from the eth2 interface of node1(controller node). Find out which interface in your laptop corresponds to eth2 in controller node. Then run the following comands in your laptop. (Assuming the interface is vboxnet5 and wlan0 is connected to internet)
    # The out interface for masquerading
    iptables --table nat --append POSTROUTING --out-interface wlan0 -j MASQUERADE
    # Forward from vboxnet5
    sudo iptables --append FORWARD --in-interface vboxnet5 -j ACCEPT
Now try to ping google.com. If you are unable to do so, open /etc/resolv.conf and change nameserver to 8.8.8.8 . If you have gone through above steps correctly, you should be able to access internet from the vm created by openstack.
What about node2?
You can bring your node2 up anytime after you have a running node1. Things run very smooth when you add a compute node which is quite surprising ;) .
What happens behind the scenes
By default devstack uses vxlan to provide L2 connectivity to vms in the same subnet. It creates a private network called private with subnet-range 10.0.0.0/24 and a public network with range 192.168.200.0/24. It creates a router called router and attaches the above private network as one of the interface and sets gateway with one of the ip addresses from the public range. The gateway set for this range of public address is by default 192.168.200.1 . In this it resides in your laptop or the machine in which you created node1, node2, node3.
Known Issues
Even after adding security group rule to allow ssh traffic to your vm, you won’t be able to ssh into cirros vm’s in compute node. Solution
How does neutron work
I will leave this for another blog post. You can find all the files used and conf files assoicated with nova and neutrona at devstack-neutron-multinode